
My Favourite Hikes in Kananaskis (So Far!)
- Mar 14, 2020
- 31 min read
Updated: Aug 9, 2025

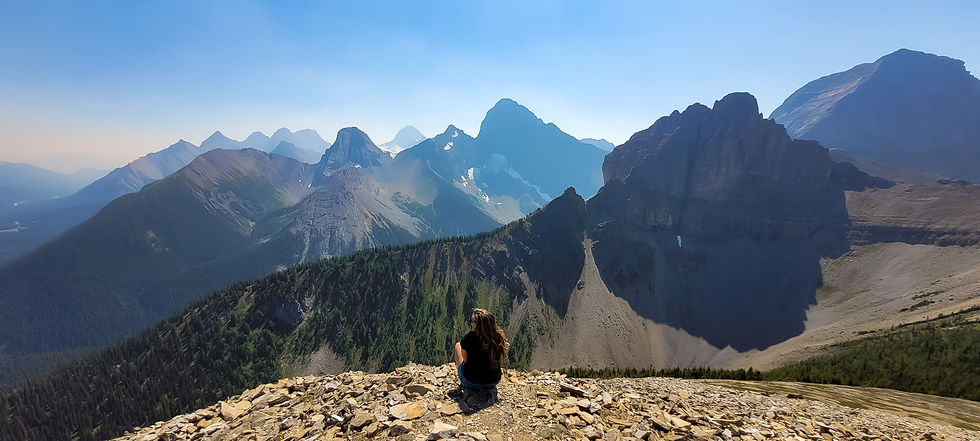
Kananaskis Country is my preferred hiking spot in Alberta, Canada; its mountain ranges literally creep into my backyard and its beautiful, sweeping vistas never get old.
Part of the Canadian Rockies, K-Country is made up of several small provincial parks. Outdoor enthusiasts will enjoy its plunging glaciers, green meadows filled with wildlife and alpine flowers, towering mountains and peaks, but won't miss the stifling crowds of the much larger Banff and Jasper National Parks.
Make sure you purchase a Kananaskis Conservation Pass (Day Pass: 15 $ - Annual pass: 90 $ with two registered cars); the fine for parking without one is 150.00 $. Before setting out, check the Kananaskis Country Trail Report for possible trail closures and warnings; you are in grizzly territory. Hike in a group, keep your bear spray out (not in your backpack!) and know how to use it.
These are my favourite hikes in K-Country; the best bang-for-your-buck trails, where the rewards surpass (or at least match) your efforts. The times and difficulty levels are subjective and approximative (I’m in OK shape and exercise on a whenever-I-feel-like-it basis), so don’t take them for gospel. Just strap on your boots and get hiking!
North Kananaskis Pass

* Map
* Overnight hike (2 days, 1 night)
* 16 kms one-way to Turbine Campground, 18 kms one-way to North Kananaskis Pass
* Trailhead: North Interlakes Parking Lot (Peter Lougheed Provincial Park)
This hike takes you out of Alberta’s Peter Lougheed Provincial Park and just into BC, so you can leave your footprints in two provinces on the same day, which is kinda fun. North Kananaskis Pass is a rewarding and relatively easy-going hike, as far as long hikes in the Canadian Rockies go.
From the North Interlakes Parking Lot (in Peter Lougheed Provincial Park), take the path around Upper Kananaskis Lake towards Forks Campground (signs might also indicate South Kananaskis Pass). The trail rambles through beautiful and diverse terrain; the going is pretty good so far. Once you hit Forks campground (at 7.2 kms), you’ll head North toward Turbine Canyon.
Eventually, you’ll head onto some steep switchbacks and sustain a slower pace for at least one good hour. Keep huffing and puffing; this is the only real challenging part of the entire hike. Look up from time to time to catch the beautiful views of Mount Lyautey.

The switchbacks are done after about 1-1.5 hours of effort. At roughly 11.5 kms, the trail meanders through a forest before breaking onto a plateau with a lovely watering hole called a tarn, Putnik Pond. (This water is for animals, not for humans; never drink stagnant water!)
Keep walking along the plateau and enjoy the sight of larch trees and mountain ridges reaching up into the sky.

You’ll reach Turbine Campground after roughly four hours of walking (16 kms). This campground boasts 12 sites, an eating area with tables, bear-proof food storage and an outhouse. Bring your own TP!
After you pitch your tent and set up camp, check out nearby Turbine Canyon. It’s a cool spot and quite a sight to behold but man, it’s a long drop! Guys, don’t be punks and give your girlfriend a heart attack by jumping over the narrow gaps; there’s absolutely no way to survive that fall.
The next morning, I walked the remaining 2 kms to Maude Lake and North Kananaskis Pass, instant coffee in hand, to get a beautiful shot of the sun shining on the surrounding peaks. It’s a slightly uphill trek through meadows and small trees; not a problem, even at 7am.


I returned to Turbine Campground to pack up my tent, then walked the 16 kms back to the car in a few hours of easy rambling. Much more chill on the way back. This hike was the highlight of my summer!
If you’ve got extra time, you might want to consider doing this trip in two nights and three days (both nights at Forks Campground).
Day 1: Short hike from car to Forks Campground (7.2 kms), set up tent.
Day 2: Long day hike from Forks Campground to North Kananaskis Pass and back again (roughly 20 kms return), spend night 2 at Forks.
Day 3: Short hike from Forks Campground back to car (7.2 kms).
Forks Campground is a forested spot with 15 pads, outhouses, tables and benches as well as a metal food cache. Site #15 is the most coveted one.
The main advantage to this route is the climb through the switchbacks without your large backpack, as your tent got set up at Forks the night before. So it’s a much quicker run and much less of a puffer - just bring your camera, water and snacks!
North Kananaskis Pass is one of the easiest and most accessible multi-day treks I’ve ever done. Kids who are in reasonably good shape could easily do it. The views are great, and the only minor slog is made a bit more tedious by the weight of your backpack through the switchbacks. Overall, this is a fantastic overnight hike that I strongly recommend.
Sarrail Ridge (via Rawson Lake) Map
* Day hike (Half-day if just going to Rawson Lake). Out-and-back. Well-signed trail.
* Distance: Roughly 4 kms one-way to Rawson Lake (1.5 hrs), an extra 2 hrs return for Sarrail Ridge
* Elevation gain: 300m to lake, a very steep 355m extra to Sarrail Ridge
* Trailhead: Upper Lake Day Use Area, use southernmost of the 3 parking lots

Rawson Lake is a popular summer hike, as well as a great option for snowshoeing in winter. You can do it with kids (if they’re used to hiking) and with leashed dogs, but expect the trail to be very busy on summer weekends. This hike is less accessible during shoulder seasons, where slushy conditions and melting snow make it an awkward choice. However, I would completely avoid Sarrail Ridge in the winter.
Make sure you’ve packed properly and don’t rely on cell service in this area of Peter Lougheed Provincial Park. OK, now let's get going!
RAWSON LAKE TRAIL DESCRIPTION
The trailhead to Rawson Lake is part of the Upper Kananaskis Lake circuit, a chilled-out walk through forests of fir and spruce. About 1 km in, you’ll cross Sarrail Creek bridge over (you’ve guessed it)... Sarrail Creek Falls.
After the fork, stride onwards for about 1.5 kms on wide switchbacks. You’ll gain an impressive amount of elevation here, but you’ll know you’re getting close to the lake once the terrain levels out and the climbing becomes less laborious.

Roughly 1.5 hours after leaving your car, you should happily break through to beautiful Rawson Lake. The majestic headwall of Mount Sarrail rises an impressive 1200m above the lake.

This magnificently calm body of water lies in a spectacular glacier-carved cirque. But DON’T make the mistake of stopping here. Go left and follow the trail around the southeastern shore of Rawsom Lake for beautiful views of the meadows lying below the impressive 1200-meter headwall.

Stay away from the boggy shore, especially in winter, and watch out for avalanches in winter. Even on busy summer days, there are tons of spots for everyone to sit and admire the views without feeling crowded.

At the 4km mark, you’ll see the trail scramble upslope towards the saddle right of Mount Sarrail. If the walk to Rawson Lake failed to satisfy your lust for hearty hiking, the very steep climb to the saddle outta do it.
SARRAIL RIDGE TRAIL DESCRIPTION
Now, be warned. The trail leading to Sarrail Ridge is the most precipitous bit of dirt that I’ve ever hiked. It’s sandy and slippery and I wouldn't recommend it in the rain. If you’re willing to endure the cardiovascular slog, I heartily encourage you to push upwards, as the reward far outweighs the effort.
It’s a straight-up, 350m climb to the saddle, with no switchbacks to dumb down the grade; allow yourself a good hour to get up there. I'm fairly certain I panted like a bear in heat the whole way up.

You might have to use your hands on the way up (Yes! Let’s get our hands dirty!) and the scramble down will seem even steeper; most people did it on their bums or backwards while holding on to the stunted trees. There is a rope in one section to assist people going down (don’t let your ego interfere here; grab the damn rope). But don’t allow these details to deter you - I assure you it’s 100% worth it. Keep at it, my friend!
Once you euphorically reach the col, I strongly recommend that you keep heading upwards in either direction (left or right) for stunning views of Upper and Lower Kananaskis Lakes waaaay below and Mount Indefatiguable straight ahead.

Kick back and enjoy your well-earned snack in one of the most stupendous sitting areas of the Canadian Rockies.
Pocaterra Ridge Map
* Day hike (challenging ridge walk)
* Roughly 10 kms one way (point to point) Give yourself 5-7 hours.
* Roughly 550 m elevation gain; 875 m elevation loss
* Trailhead for both options: Highwood Pass parking lot
** Option 1: Shuttle hike (point-to-point), roughly 10 kms, South to North. (Start at Highwood Pass (South), end at Little Highwood Pass (North). Two vehicles are necessary.) Pocaterra Ridge (Point to point) - AllTrails site
** Option 2: Out and back Pocaterra Ridge (Out and back) - AllTrails site

Option 1: In my honest opinion, the best way to hike Pocaterra Ridge is as a shuttle hike (point to point); this will give you more time on the ridge itself without having to retrace your steps. Park your 1st vehicle at Little Highwood Pass, then drive your 2nd car to Highwood Pass to start the hike. Once you finish at Little Highwood Pass, drive your 1st vehicle back to Highwood Pass to pick up your 2nd car.
Option 2: Park and start at Highwood Pass parking lot, turn around at any point in the hike and go back the way you came. That easy! I’d recommend going at least as far as the 3rd or 4th bump on the ridge before turning back, in order to see as much landscape as possible. You'll want hiking poles to descend that first steep hill that you slogged up earlier!
Highwood Pass is the highest point in Canada accessible by a public road. Keep in mind that the portion of Hwy 40 which leads to Highwood Passthis is closed every year between December 1st and June 15th.

Trail-finding is a bit tricky in the beginning, as there is lots of trail braiding, but it’s difficult to get lost. In the beginning, make sure you don't follow the trail across the highway (that one's for Ptarmigan Cirque), but turn left at the sign in the meadow. You won’t be the only person there, as this is one of the premier hikes in Kananaskis (although it is not an official hike and consequently, not always well-marked).
You'll eventually find yourself following a stream and come to a (non-signed) fork in the road. The left trail goes up to Grizzly Col and Grizzly Ridge; don't follow it. Go straight, as the first and toughest hump on Pocaterra Ridge is the big beautiful green one to your right - you'll need to wind your way around it before eventually ascending it.

That first uphill climb (starting about an hour into your trek) is the only significant slog on this entire hike; think of it as an investment in your upcoming reward. The steep incline only lasts about 45 minutes, so suck it up! And drink your water!
The cool thing about ridge hikes is that once you ascend that first hill, your views will be uninterrupted. On Pocaterra Ridge, that means roughly 10 kms (5-6 hrs) of happy tramping up and down gentle lumps, almost like traipsing along the rolling spine of a gigantic brontosaurus. You gain and lose elevation as you hike over its bumps, but nothing like that first hump.
At the end of the last hump, a very steep descent through the forest awaits; hiking poles are very strongly recommended. The path is usually very well-indicated; that is, until the last 5 minutes (300m) of your hike.

After a very steep, final descent through a forest, the trail seemingly stops. This is where many hikers get lost; multiple trailbraids have been created by people attempting to find the right path. We could hear traffic on Hwy 40, so we knew we were frustratingly close.
Here are the precise directions I would have appreciated having for this very last part of the hike: When you emerge from your steep descent through the forest, you will see a white ribbon hanging from a tree just past a dry creek of white rocks. Do not cross this dry creek: rather, take the very poorly-marked trail on your right (just before the dry creek, running alongside it), indicated by two worn orange ribbons. This will lead you to a small brook.
You must cross this brook (you'll get your feet wet, but you've finished your hike anyway), and then the trail will reappear towards the right on the other side of the brook (you can't see the trail until after you cross this brook, which can be really frustrating).
After two minutes of walking through forest, you'll reemerge directly across Little Highwood Pass parking lot. Eureka! Drive your car to Highwood Pass to pick up car #2.

EEOR (East End of Rundle) MAP
* Day hike, in-and-out
* 3.2 kms to summit (one-way), 1043 m elevation gain (rated as difficult)
* Also known as South Summit of Mount Rundle
This challenging hike offers beautiful views from the very beginning right up until the summit. It gets rather technical toward the top, and hiking boots (not running shoes), as well as hiking poles, are strongly advised. Microspikes or crampons are recommended in late spring/early summer or fall.
The trail starts out between the double telephone poles along Spray Lakes Road and immediately heads steeply into the forest. The views will be captivating from the get-go, but don’t walk distractedly; there isn’t much room for error on the rocky and sometimes exposed path. Pay attention to markers, which will guide you mostly toward the right flank of the mountain.

The path skirts the edges of cliffs on a few occasions; small ledges allow for stunning views of Ha Ling Peak and Whiteman’s Pond. Take advantage of this opportunity to take stunning photos, sneak in a bit of food and chug some water.
After grinding your way up for at least 60 - 75 minutes, the path relents a bit above the treeline and opens up into vast meadows. You’ll see the rockwall ahead of you (up on your left).
Keep climbing on the rocks through the meadows toward the grassy bench and false summit (to the right). You’ve worked hard to get here; take time to refresh yourself and enjoy the far-away peaks beyond. Many people are satisfied and end their hike here, but it would be a shame to turn around now.

To tackle the final ascent, follow the trail that runs all along the bottom of the huge rockwall. Don’t make the mistake of trying to shortcut your way up; there aren’t many ways up the imposing wall of limestone and it would be folly (or even suicidal) to improvise it.
You’ll eventually see a black rockband on the wall; here the trail clambers over some large boulders. After about 10 minutes of scrambling (use your hands to steady yourself, as the path narrows but retains its steep incline), you’ll suddenly see the summit promontory. Congrats; you’ve reached the top of one of the most imposing mountains in the Canadian Rockies!

On the way down, before you hit the tree line, the scree is tricky and sometimes frustrating to navigate; this is the time to take out those hiking poles. Lots of hikers were unsettled, as rocks and pebbles inevitably dislodged under their shoes from the steep incline.
Naturally, it's easy to get off-trail here, as you concentrate on your steps - try to stop and look ahead to ensure you're on the proper trail, as you wouldn't want to backtrack or traverse on the scree.
When you reach the meadows, stick to the trails heading down and left, hugging the mountain’s edge as you near the tree line. There are lots of trails braiding through the forest, but the main trail bears generally left throughout the descent.
Once you reach your car, dip your tired feet into Whiteman’s Pond for a cool treat. You’ve certainly earned it!
Tent Ridge Horseshoe Map
* Day hike, horseshoe loop (to be hiked clockwise)
* 10 kms round trip, 657m in elevation gain (Some exposure and scrambling - read warning in article below)
* Trailhead: Down Mount Shark Road (off Spray Lakes Trail). The parking lot is on the right, about 2 kms passed Mount Engadine Lodge. 1h 15mins from Canmore.
* Recommended reads : HikeBikeTravel, 10Adventures and Alltrails
Tent Ridge is definitely one of the most rewarding hikes I've ever done and one of my all-time favourites. Average hikers will feel challenged but will be able to complete it, and it's tough enough to keep the crowds at bay. You'll walk through a mossy larch forest, cross an alpine meadow, trudge up loose exposed scree, then return via a steep hillside. Oh, and did I mention you'll see absolutely stunning views throughout? Yeah.

To find the proper trailhead (you don't want to accidentally take the return path, which is signed), walk back from the parking lot to the trail heading up a grassy hill. About ten minutes in, you'll be guided onto another path to your right, indicated by rocks placed in the form of an arrow and bright ribbons in a tree. You'll head up into a steep, dense forest; enjoy the lushness, but make lots of noise.
After an hour of hiking, you'll enter a large meadow/basin. Tent Ridge Horseshoe looms ahead; the horseshoe's two arms straddle you on either side. Go left from the meadow into another forest, which will begin the steep ascent onto the rockslide. This is where some short but adventurous scrambling begins.
Warning: On this ascent of the left arm, there are a few high / exposed spots, where a fall could mean a helicopter ride to the hospital or worse. There will also be a 15-foot near-vertical wall to climb up, so minimal rock climbing skills will help here. If you're not used to scrambling or are afraid of heights, you might want to reconsider this trail.
Don't let more experienced hikers tell you that it's not really dangerous; sheer exposure doesn't lessen with experience, cockiness or comfort with heights. That being said, there is always a spot to place your feet or a ledge to hold onto with your hands. I am afraid of heights and found that I was nervous but capable. Do make sure you secure your hiking poles in your bag - mine were tucked in the side pocket of my backpack, but they caught the rock wall a few times, throwing me slightly off balance.
Didn't help my nerves.
From the meadow, it took about an hour to scale the first arm and arrive at the communications cabin, and what an incredible sight awaited us there! This is an excellent spot for lunch. Descend the horseshoe saddle and climb back up, for about 30-40 minutes, to the 2nd peak (high point) for more stunning views. I found the saddle to be the most beautiful part of the hike.

The right arm is now stretching out in front of you and there's some exposure if you walk too close to the ledge. Stick to the left side of the slope. This is the most chilled-out part of the hike; you'll make your way along the second arm with unimpeded views of the Spray Valley.
At the end of the arm, a very steep descent into an open gulch awaits you; lots of trails intersect here, but they all pretty much lead back to the main trail. Once you catch it, it's about an hour back to the parking lot through forest and a right turn onto an old 4x4 track.


This hike offers continual, unimpeded views, thanks to its high ridge and horseshoe shape. There are a few places where one can lose track of the trail, so pay attention. But all in all, this ridge walk is an absolute gem and 100% worth the effort on a clear day.
Sparrowhawk Tarns Map
* Dayhike, in-and-out
* 7 kms one-way, 700 m elevation gain (roughly 6 hours)
* Trailhead: Across the Smith-Dorrien road from Sparrowhawk Day Use Parking Area

The trail to Sparrowhawk Tarns starts off a bit steeply through forest; it follows the same path used for Read's Ridge and Mount Sparrowhawk, so there are a few trails continuously branching off.
There’s a cairn about 1 km in; make sure to keep going straight, as the trail to Read’s Ridge-Mount Sparrowhawk goes left and it’s easy to take it by accident. Better yet, bring a map; this is one hike where I’ve found a map to be quite useful.

Once out of the forest, the trail meanders uphill through fields of boulders and scree. The path isn’t always easy to see, but the valley is narrow; keep walking up and you can’t go wrong. Look for fossils, as there are quite a bit strewn about in the rocks. You'll have to negotiate a path through many boulders, so good hiking boots will be a definite plus today. Have fun with it; you can't get lost in this valley.
The path eventually gives way to beautiful meadows of moss, intercut with narrow ribbons of glacier water. If you’re lucky enough, you’ll be there when the wildflowers are out.

The best thing about this trail is that it eventually leads to multiple tarns, small ponds of turquoise glacier water. At this point, a good part of your day will be spent hopping from tarn to tarn and exploring the ridges between them. On a hot summer day, the water will be shockingly refreshing; take your socks off and dip your feet in!
My only regret about doing this hike was NOT taking a photo of the lovely little tarns. I was too busy enjoying the sunshine and the cold water on my swollen feet. Definitely recommended.
Burstall Pass Map
* Dayhike, in-and-out
* 8 kms one-way, 470m elevation gain
Burstall Lake is one of the most well-travelled trails in Kananaskis, and for good reason. The relatively moderate path allows for splendid views of mountain peaks (including Mount Assiniboine) and beautiful open meadows. Do not let the crowds deter you.
Burstall Trail hike starts out casually; a logging road, then a single track, winding its way through forest for a few kilometres until you reach the Burstall plateau. You’ll have to cross this plateau to continue the hike But first, I suggest taking a short deviation left (south) into the obvious valley to take a quick peek at Robertson Glacier (not pictured). It’s kinda cool.

Back onto the plateau, you’ll have to cross many small, braided streams to continue to Burstall Pass. Depending on the time of year and the volume of melting water from the glacier, you’ll have to either skip and hop over stones or logs, or remove your socks and shoes and wade barefoot. The water is cold and ankle-deep, and the bottom is muddy, but none of it is dangerous. Have fun with it!
After the meadow, 4 kms in, the trail ascends up a steep footpath through forest, then open meadows. Beautiful, razor-sharp peaks across the valley pierce the sky, to the right of the trail as you’re ascending.

Eventually, at 7.5 kms, the trail arrives at Burstall Pass. You can continue as far as you’d like before turning around, or find a cool spot to eat and enjoy the view. The boundary of Alberta and British Columbia is near, and on a clear day, you’ll be able to spot beautiful Mount Assiniboine, the tallest mountain in the Southern Canadian Rockies (about 20 kms away).
Once you’ve had your fill of beautiful Kananaskis countryside, simply turn around and head back down the way you came in. As with all hikes, bring bear spray, lots of water and food, as well as a chilly flask of wine to celebrate a beautiful day!
Wind Tower (via West Wind Pass) MAP
* Dayhike, in-and-out
* 6 kms to the top of the tower, 920m in elevation gain
* 5 to 8 hours (times vary enormously according to different cardio abilities)

What a hike this was! The one-hour trek to West Wind Pass is a hike of its own, but if you continue up to Wind Tower, your hard efforts (and probable frustration) will be rewarded with stupendous views if you push yourself up there. Its difficulty keeps many hikers at bay, so it won't be crowded.
I'll be honest, I'll probably never do this hike again but I'm glad I did it. My friends all hated it and one of them was kinda mad at me for taking her. It's a bit of a relentless slog, but some people just love it. So it made it onto this list.

I’ve divided this hike into 3 parts. The first part is the walk up to West Wind Pass. You’ll wander up a steady and steep pathway through the forest; make sure to take a right at the homemade sign about 4-5 minutes in. There’s a lot of trail braiding throughout the trek; I tend to stick to the paths on the right. Be careful near the cliff bands; watch your step and use your hands if necessary.

Spray Lakes Reservoir will be visible through the trees throughout your climb. You’ll reach West Wind Pass in about 60 - 75 minutes. Enjoy the views from both sides of the pass and take advantage of the lovely meadow to eat and energize.
When facing Spray Lakes Reservoir, you’ll see the trail to Wind Tower continue up the slope on your left (ignore the sheep trail going down into the forest). For the next hour, this second part of the hike curves wide all around the mountain; you’ll need your hands frequently to scramble over rock faces and small cliff bands. I loved walking through these trees, scrambling over the boulders and getting increasingly better views of the lake below. Watch for cairns when the path fades; the route isn’t always super obvious but it’s nevertheless difficult to get lost.

The third part of the hike (the longest and toughest) starts when the earthy and rocky trail becomes a scree slope. The path follows a steep scree path straight up to the top, with a few small switchbacks here and there.

Mount Lougheed to your right will loom larger and larger as you ascend, and the iconic Three Sisters will gradually emerge from their hiding place to your left. Many hikers I crossed here complained of the interminable upward slog, but keep at it. You’ll reach the summit of the tower in about another 90 minutes.
Enjoy the incredible 360 views from the top; it’s taken you roughly 3-3.5 hours to get up here and the views are unparalleled. Watch for the sudden, sheer vertical cliffs; it’s an unsurvivable fall. Bring a good wind jacket and hold on to your belongings; Wind Tower has earned its name.

Your return will be a steep slide down the same way you ascended; hiking poles and hiking boots (as opposed to running shoes) are a tremendous help here. It will take you 1.5-2 hours to descend. Don’t let the loose scree intimidate you; lead with your heel and slide down. Once you get back down to the wildflowers and the trees, the trekking feels pretty breezy again.
Chester Lake MAP
* Dayhike, in and out. Sign at trailhead. Dogs must be leashed.
* Distance: 9 kms return (roughly 4 hrs)
* Elevation gain: Roughly 320 m
* Difficulty: Easy to intermediate
* Trailhead: Chester Lake Parking Lot, on Hwy 742 (Smith-Dorrien Road), 45 kms from Canmore
You will not be alone on your hike to Chester Lake. It’s a relatively short trek that’s well worth the effort, albeit less rewarding in terms of grand sweeping views than neighbouring Burstall Pass (the two parking lots are on opposing sides of the Smith-Dorrien Road).
Due to its easy grade and kid-friendly terrain, Chester Lake is easily the most popular hike in K-Country. As a local, I tend to avoid it on most weekends, but you can decide for yourself whether or not it's worth the crowds. It's fantastic in the fall (larches!) and a great snowshoeing spot in the winter as well.
If you've got kids or are just starting to hike, Chester Lake is the trail for you.

Trail description
Even though Chester Lake tends to be most people’s turn-around point, there are options to keep going to Elephant Rock (add one hour) and even to Three Lakes Valley (add 2-3 hours and 240 m of elevation gain).
The trail is easy to follow throughout and begins at the sign near the washrooms in the corner of the parking lot.
The first 2 kms wind through forest on a broad logging road; don’t let this discourage you. Soon enough, you’ll find yourself surrounded by spruce and alpine fir. Keep to the left at all intersections.
The path is moderately steep for the first few kilometres, nothing that a reasonably active child or adult could not tackle. What’s nice about this hike is that you’ll get the steepest parts over and done with at the beginning. The trail will start to narrow after about 30-40 minutes.
At 3 kms, the trail opens up a bit into small clearings strewn with yellow lilies and alpine buttercups in late June and early July.
Just another kilometer until you reach the larger meadow, which will give you your first glimpses of Mount Chester (along with Mount Galatea and The Fortress).

The last part of the hike, through the meadow and approaching the lake, is mostly flat; you’ll have increasingly better views as you get closer. Breathe in that fresh air; the hard work is done!
Mount Chester looms over the lake with sharp, serrated cliff edges; the whole thing is quite dramatic and lovely (especially with fall colours or a light dusting of snow), and more than worth the effort you’ve put in to get there.

When you approach the lake, there are a few nice spots off to the right (over a small bridge) to enjoy a snack or to rest.
Please remember to leave nothing behind and to pack your garbage and dog droppings with you.

Try to spot a pika amongst the large boulders and enjoy your lunch along the lakeside. Strike up a conversation with your fellow hikers, as you certainly won’t be the only one enjoying the scenery.

If you’ve got more energy after snacking and admiring the lake, make your way up the small trail at the left (leading up into the forest at the far end of the lake) to Elephant Rocks. It’s just another 10 minutes and the kids will thank you as the rocks are oddly shaped and offer lots of space for hiding and playing.

As I haven’t actually made the trek to Three Lakes Valley, I’ll offer just a brief description here and no photo. The first lake is a good 15 minutes from Elephant Lakes along rocky steps. The second lake is along a relatively flat but rocky path and could be reached after an additional 30 minutes. The third lake is reportedly often dry but is worth the effort due to the massive peaks surrounding it.
When you’ve had enough, retrace your steps back to the Chester Lake parking lot.
Wasootch Ridge MAP

* Day hike. Out-and-back. No signs, but fairly distinct path.
* Difficulty: Moderate / challenging hike
* Distance: Roughly 11-13 kms (5-7 hrs total)
* Elevation gain: At least 800 m
* Trailhead: On Hwy 40 (Wasootch Day Area parking lot)
* Dogs: On leash (no warning for fines)
You’re definitely into the moderate hiking zone with this one. Wasootch Ridge isn’t a great beginner hike; although there are very few exposures (until the final scramble at the arete, which is avoidable), but the trail narrows in a few spots and it's intermittently steep throughout.
TRAIL DESCRIPTION
The path begins at the sign near the large parking lot (behind the picnic table), leads into the trees and immediately shoots up. Follow the trail uphill through the forest and use the occasional tree to pull yourself up (they’ll be useful to catch yourself on your way down). Check out how quickly you gain elevation; the valley bottom is visible throughout.
You’ll reach the top of the first hump after 20-25 minutes. Some flat walking will give you the chance to breathe and take in the sights before starting your ascent of the 2nd hump. You’ll likely hear echoes of voices and rock climbing gear from down below, as the Wasootch Canyon walls (to your right) reverberate rather clearly. Not a great place to share secrets.

It’ll take a good 30-40 minutes of uphill walking to get to the top of the 2nd hump. I think this is the most tedious part of the hike, though you’ll have several flat areas to catch your breath. The top of the 2nd hump is a plateau, so you’ll walk a good 20 minutes with a few ups and downs. The views here start to make your efforts worth it.
To be honest, I stopped keeping track of all the ups and downs after the 3rd hump. Just be prepared to rollercoaster up and down the ridge; it does mellow out after you’ve crowned the mighty 2nd hump.

Keep your eyes on your feet; stop walking before gazing around at the view. As much as this ridge isn’t hugely exposed, you don’t want to trip. Death by rubbernecking? No thanks.

We’ve never made it to the summit of Wasootch Peak (ran out of time on both tries), and there’s no need for an official place to stop. When you’ve had enough, turn around and head back down the way you came. (The views are amazing at the 4th hump, if that helps).

If you wish to keep going and summit Wasootch Peak, you can scramble along an exposed arête that looks like a dinosaur’s crete on your way to the peak. Not gonna lie, it looks a bit intimidating. From the cairn, Wasootch Peak is another 1.6 kms and an extra 250 m in elevation (give yourself two hours to summit and get back to the cairn).


Wasootch Ridge is another gem of a hike to check off your list in beautiful Kananaskis Country, Alberta. I hope you enjoy it enough to place it into your top Kananaskis hikes!
Prairie View Trail MAP

* Half-day hike, out-and-back. Dogs must be leashed. Obvious trail with several signs.
* Distance: Roughly 12 kms return (roughly 4 hrs)
* Elevation gain: Roughly 550m
* Difficulty: Moderate/intermediate
* Trailhead: Barrier Lake Day Use parking lot (off Hwy 40)
This very popular route starts at the Barrier Lake Day Use parking lot, just off Hwy 40 in Kananaskis Country. It follows the Prairie View Trail to a few lookouts, as well as an option to summit Yates Mountain at the fire lookout station. The hike to Yates Mountain is sometimes referred to as Barrier Lake Fire Lookout. You can also return via Jewell Pass rather than retracing your steps.
This is a good year-round hike in the Canadian Rockies. Try to arrive early at Barrier Lake in order to secure a parking spot (parking on the highway risks a hefty fine).
TRAIL DESCRIPTION
From the parking lot, head down past the gate towards Barrier Dam and walk on the path skirting it. This section is always very windy (hence cold), so cover up for this flat section of the trail.
After the first km, you’ll cross under the power lines; consult the trail map and stay on the main Prairie View walking trail. You’ll start gaining elevation quickly and steadily now.
The hike slowly switchbacks through the forest, up a wide trail for a few kilometres, and is relatively uninspiring. You’ll get your first views on your left as you skirt McConnell Ridge.

Not long after McConnell Ridge, you’ll break out onto flat ground and get to the first viewpoint.

After the first lookout, keep ascending the path for another kilometre as it narrows and steepens through some rocky terrain. There’s no exposure or danger but as you near the top, you’ll clamber over several large boulders and might even use some trees for balance. In the winter, spikes or ice cleats will be immensely helpful here, as this area gets icy and very slippery. You’ll eventually land atop the flat rocks at Prairie View. Here comes the final lookout!

Once you’ve gotten your fill of this beautiful vista, retrace your footsteps back down to the Barrier Lake parking lot.
YATES MOUNTAIN
I’ve never continued up to Yates Mountain (or Barrier Lake Fire Lookout) but if you wish to, look for a sign indicating Trail not maintained beyond this point near the second lookout. The trail is short (15 min) and steep with a bit of exposure. You’ll spot a helicopter pad, as well as picnic tables and the lookout hut.
Remember that this is someone’s summer residence, so be cool and respectful and keep your distance, even in winter. Look for a sign pointing toward the viewpoint and retrace your footsteps once you’re ready to head back.
There’s also an option to return via Jewell Pass instead of Prairie View Trail.
Arethusa Cirque MAP

* Day hike. Out, loop and back (lasso-shaped). Trail not signed. Dogs must be leashed.
* Distance: Roughly 5 kms return (2.5 - 3 hrs total)
* Elevation gain: Roughly 350m
* Trailhead: On Hwy 40, 1.2 kms south of Ptarmigan Cirque parking lot (look for pullout on east side of hwy)
I had wanted to do this hike for years and had always hesitant because allegedly, it’s poorly marked. And so it is! Arethusa Cirque is an undesignated trail and is not maintained by Alberta Parks, as evidenced by lots of erosion and braiding. But one beautiful summer day, I decided to bite the bullet and I’m so glad that I did! Whichever time of year you choose to venture out on this trail, I can safely say this is one of the best bang-for-your-buck hikes I’ve been on.
During the larch season (mid-September to mid-October), this hike gets as crazy busy as a Saturday afternoon at IKEA. Arethusa Cirque is considered both a premier and easy larch hike, so you’ll have to keep your cool whilst searching for a spot in the small parking lot. Attendants are often on site to prevent visitors from parking on the shoulder.
TRAIL DESCRIPTION
The trail begins at the far end of the parking lot and is very obvious throughout the forest. There are lots of roots on the climb up, so watch your footing; the path is steep enough to be dodgy and slippery when wet. From the parking lot, you’ll climb steadily for almost one km (about 20 minutes).
Emerge from the forest onto a meadow, with a small brook flowing in front of you. Now this is where you’ll have to do a bit of route finding. The elusive trail is surprisingly easy to spot throughout, but only if you’re on the right path to begin with.

At this meadow, the trail becomes a loop; you’ll eventually make your way back here. It's difficult to tell because of all the trail braiding, but you really have two choices:
1 - Go right (counter clockwise) for a gradual ascent and very steep downhill later on.
2 - Cross the small stream and go left (clockwise) for a very steep ascent, but a gradual downhill afterwards.
Note: I will almost always take the 2nd option and go left, especially if it’s been raining or if there's snowmelt. I'd rather walk up the steep slope than come down it and risk a nasty fall.
I chose to go right one hot day in the summer, since conditions were bone dry, so most photos will reflect that. Look to your right for a trail that continues through the trees. (Another fall day, I went left and preferred it. I do find the trail is easier to spot and I got the steep part over and done with).

The trail to the right will almost completely pass the boulder field, which you'll eventually ascend near a treeline.
Keep your eyes and ears open for pikas. These small mammals resemble rabbits, but with small round ears; they look like large hamsters. Pikas often make an adorable eep sound to communicate and can sometimes be spotted scurrying amongst the rocks.

Once past the boulder field, you’ll see a faint trail leading up the rock pile. The terrain changes from earth-thumping dirt to clangy rocks as you gain altitude. This trail will lead you up between the boulder field and a rocky ledge on your left.


Now for your second bit of route finding. Heading up this rock band (ledge), the trail didn’t always ‘pop out’ among the rocks. Continually look ahead and around you for the trail, and it’ll be easy enough to spot. Look out for the odd cairn. Basically, your goal is to climb up the top of the ledge and go to the left toward the high green meadow, so you can’t really go wrong. Switchbacks zigzag across to ease the grade, so none of it is very steep.

Once up at the top of the ridge, you’ll walk along a scree path. It’s a relatively easy path to walk, and once you hit another small boulder field, you’re almost done with the rocky terrain for today. Another green meadow soon appears atop the hike.

At about 2.5 kms, leave the boulders behind and enter a lovely alpine meadow. To your right is an enormous cirque or bowl; that’s Mount Arethusa. Keep heading left for a mellow walk through the greenery, but take time to turn around and admire the scenery, what with those enormous rockwalls behind and to the right of you.

Keep your eyes open for grizzlies at this highest point of your hike; you’re on their turf now. Expansive views of the Highwood Range stare right back at you.

If there was a spot on this hike where a Julie Andrews impersonation (from The Sound of Music) were fitting, this would be it.
You’ve walked about 3 kms in total by now; start looking out for a small stream. Once you cross it, go left onto the dirt trail immediately alongside it. Once again, there is lots of trail braiding on the way down, but keep heading downwards, keeping the creek on your left until you eventually arrive at the bottom meadow.

You'll quickly lose altitude on the steep descent so watch your footing, as you’re unlikely to catch yourself if you fall forward. Again, poles are your friends!
After 20-25 minutes, you arrive at the end of the loop, where the lower meadow and forest meet. You must cross the little creek one last time (look around for rocks to step over), hike the last 800m back to the parking lot, and voilà! Another gem of a hike to appreciate in beautiful K-Country.


I absolutely love Canadian Rockies Trail Guide by Brian Patton and Bart Robinson. These guys are the OG of hiking in the Canadian Rockies. They have released many editions of this book and their latest one is a beautifully-photographed testament to the trails in the Canadian Rockies.
This well-worn copy of Kathy and Craig Copeland's book, The PREMIER Trails in Kananaskis Country; Where Locals Hike in the Canadian Rockies, is another one of my hiking bibles. Not only is it well-written, but I trust their taste, judgment and opinions implicitly.
I do not receive money from any of these authors and have never met them. I'm just a big fan that strongly recommends these resources.


Comments